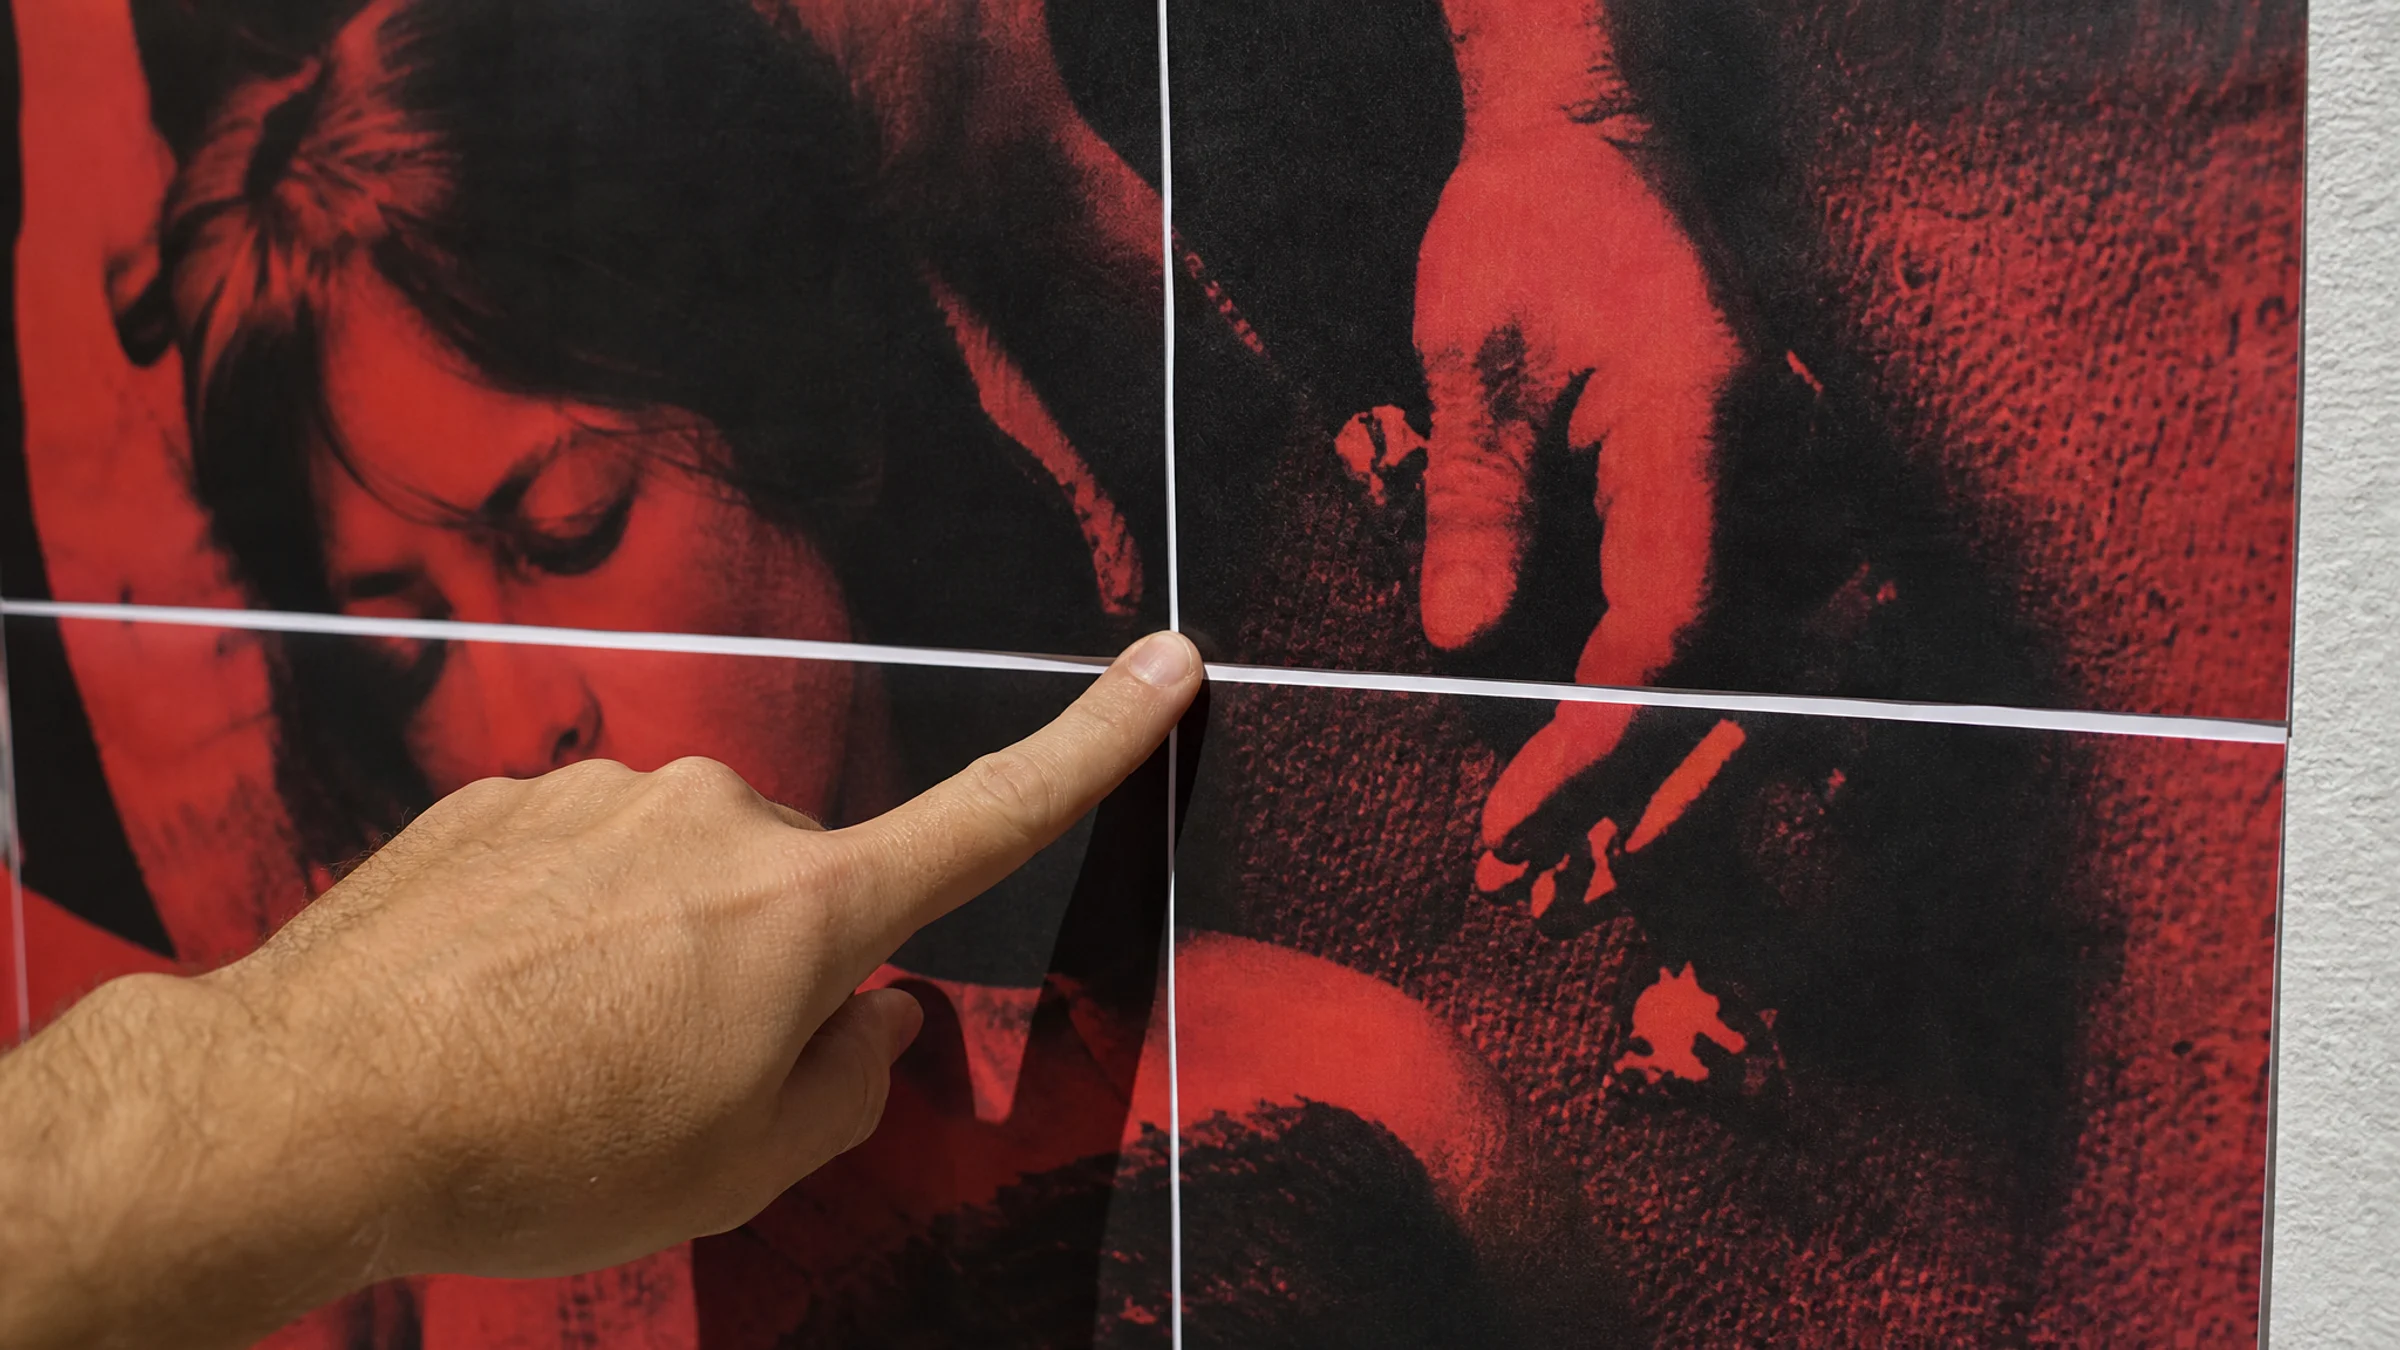
White gaps between pages are one of the most common tiled printing problems. You print a poster across several A4 or Letter sheets, line the pages up, and thin white lines appear where the image should join cleanly.
Very few consumer printers support true borderless printing. Most leave a 3–5 mm unprintable white border, so trimming is a normal part of clean tiled poster assembly.
The good news is that the poster file usually is not the problem. White gaps usually result from incorrect print settings, printer margins, missing overlap, or poor trimming.
Whether you're using Rasterbator.pics, another PDF poster tool, or Adobe Acrobat Reader's Poster mode, the same checks apply.
The symptom: your tiles almost match, but white lines appear
Typical signs:
Thin white strips appear between pages.
The image looks slightly smaller than expected.
Some pages align on one side but not on the other.
The poster looks correct on screen but not after printing.
The first row fits, but lower rows drift out of alignment.
A page edge shows no image where the printer left a blank border.
The main cause: the printer did not print exactly what you expected
If your poster design expects the image to reach the paper edge, the printer's blank border becomes a visible white gap.
Other common causes include:
Printing at Fit to page instead of Actual Size or 100%
Selecting the wrong paper size
Mixing A4 and Letter settings
Rotating some pages differently from others
Printing without overlap
Not trimming the white margin before joining pages
Assembling pages before the ink is fully dry
Using too much wet glue, which can wrinkle or stretch the paper
If you're setting up the poster in Rasterbator.pics, the tiled PDF is generated locally in your browser. After that, the final result still depends on your paper size, print scale, margins, and assembly method.
What you're fixing
| Before | After |
|---|---|
| White strips appear between sheets | Image continues across seams |
| Pages look slightly too small | Tiles print at the intended scale |
| Sheet edges do not match | Edges overlap or trim cleanly |
| Poster drifts row by row | Orientation and paper size stay consistent |
| Full poster is wasted | One test seam catches the issue early |
1. Check the paper size first
Paper size mismatch is one of the fastest ways to ruin tiled alignment.
If your poster is prepared for A4 sheets but your print dialog is set to Letter, the printer may rescale the page. If your file is Letter but your tray contains A4, the printer may crop or shrink it.
Check all three places:
The poster export settings
The PDF viewer or print dialog
The paper loaded in the printer tray
| Region | Common paper size | Dimensions |
|---|---|---|
| Europe and many other countries | A4 | 210 × 297 mm |
| United States and Canada | Letter | 8.5 × 11 in (216 × 279 mm) |
| Larger home poster projects | A3 | 297 × 420 mm |
Do not assume the printer driver picked the right size automatically.
2. Print at Actual Size or 100%
This is the setting that matters most.
In the print dialog, look for:
Actual Size
100%
No scaling
Avoid:
Fit
Fit to printable area
Shrink oversized pages
Scale to fit
Fill entire paper
These options—while useful for documents—often shrink images by a few percentage points, which ruins tiled alignment.
If you print from Adobe Acrobat Reader, check the sizing section carefully. Adobe Acrobat Reader's Poster mode can be useful for tiled printing—especially when you need overlap and cut marks—but it still requires correct paper size and scale settings.
For more print-setting basics, see our printing tips guide.
3. Plan around printer margins
Most home printers leave an unprintable border of about 3–5 mm. That is normal, and it is exactly why tiled posters often need trimming.
You have three practical options:
Use overlap
Each tile repeats a small strip of the neighboring image.
You trim one edge and place it over the matching area on the next sheet.
Trim the joining margins
Cut away the blank border where pages meet.
Join the trimmed edge to the neighboring tile.
Use borderless printing only after testing
Some printers support it, many do not.
It can slightly enlarge or crop the image, which may create new alignment problems.
For most home poster projects, overlap plus trimming is the most reliable method.

4. Add overlap if your tool supports it
Overlap gives you a shared image area between neighboring pages. That makes alignment much easier and helps hide tiny cutting errors.
A practical starting range:
| Poster size | Suggested overlap |
|---|---|
| Small poster, 4–6 sheets | 5 mm |
| Medium poster, 8–20 sheets | 5–10 mm |
| Large poster, 20+ sheets | 10 mm or more |
Too little overlap makes seams fiddly. Too much overlap wastes paper and ink. For most A4 or Letter tiled posters at home, 5–10 mm works well.
If your software adds cut marks, treat them as a guide rather than proof that the seam is correct. Always compare the image itself.
5. Trim only the edges that need trimming
You do not need to cut every side of every page.
A simple trim pattern for a 2 × 2 section looks like this:
[Keep whole]   [Trim left]
[Trim top]     [Trim top + left]
In other words:
Keep the top-left sheet whole.
Trim the left edge of sheets that go to the right.
Trim the top edge of sheets that go below.
Trim both edges on sheets that go down and to the right.
This gives each new sheet a stable reference and keeps the poster easier to assemble.
Use:
A sharp craft knife or paper cutter
A metal ruler
A cutting mat or spare cardboard
Good lighting
Cut cleanly and dry-fit the pages before gluing.
6. Keep orientation consistent
White gaps can also show up when one or more pages are rotated differently.
Before printing, check that:
All tiles use the same intended orientation for the layout
Auto-rotate is not changing individual pages
The print preview shows the full set consistently
The printer tray guides are snug so the paper feeds straight
A tile printed with the wrong rotation can look almost correct at first glance, but it will never line up properly.
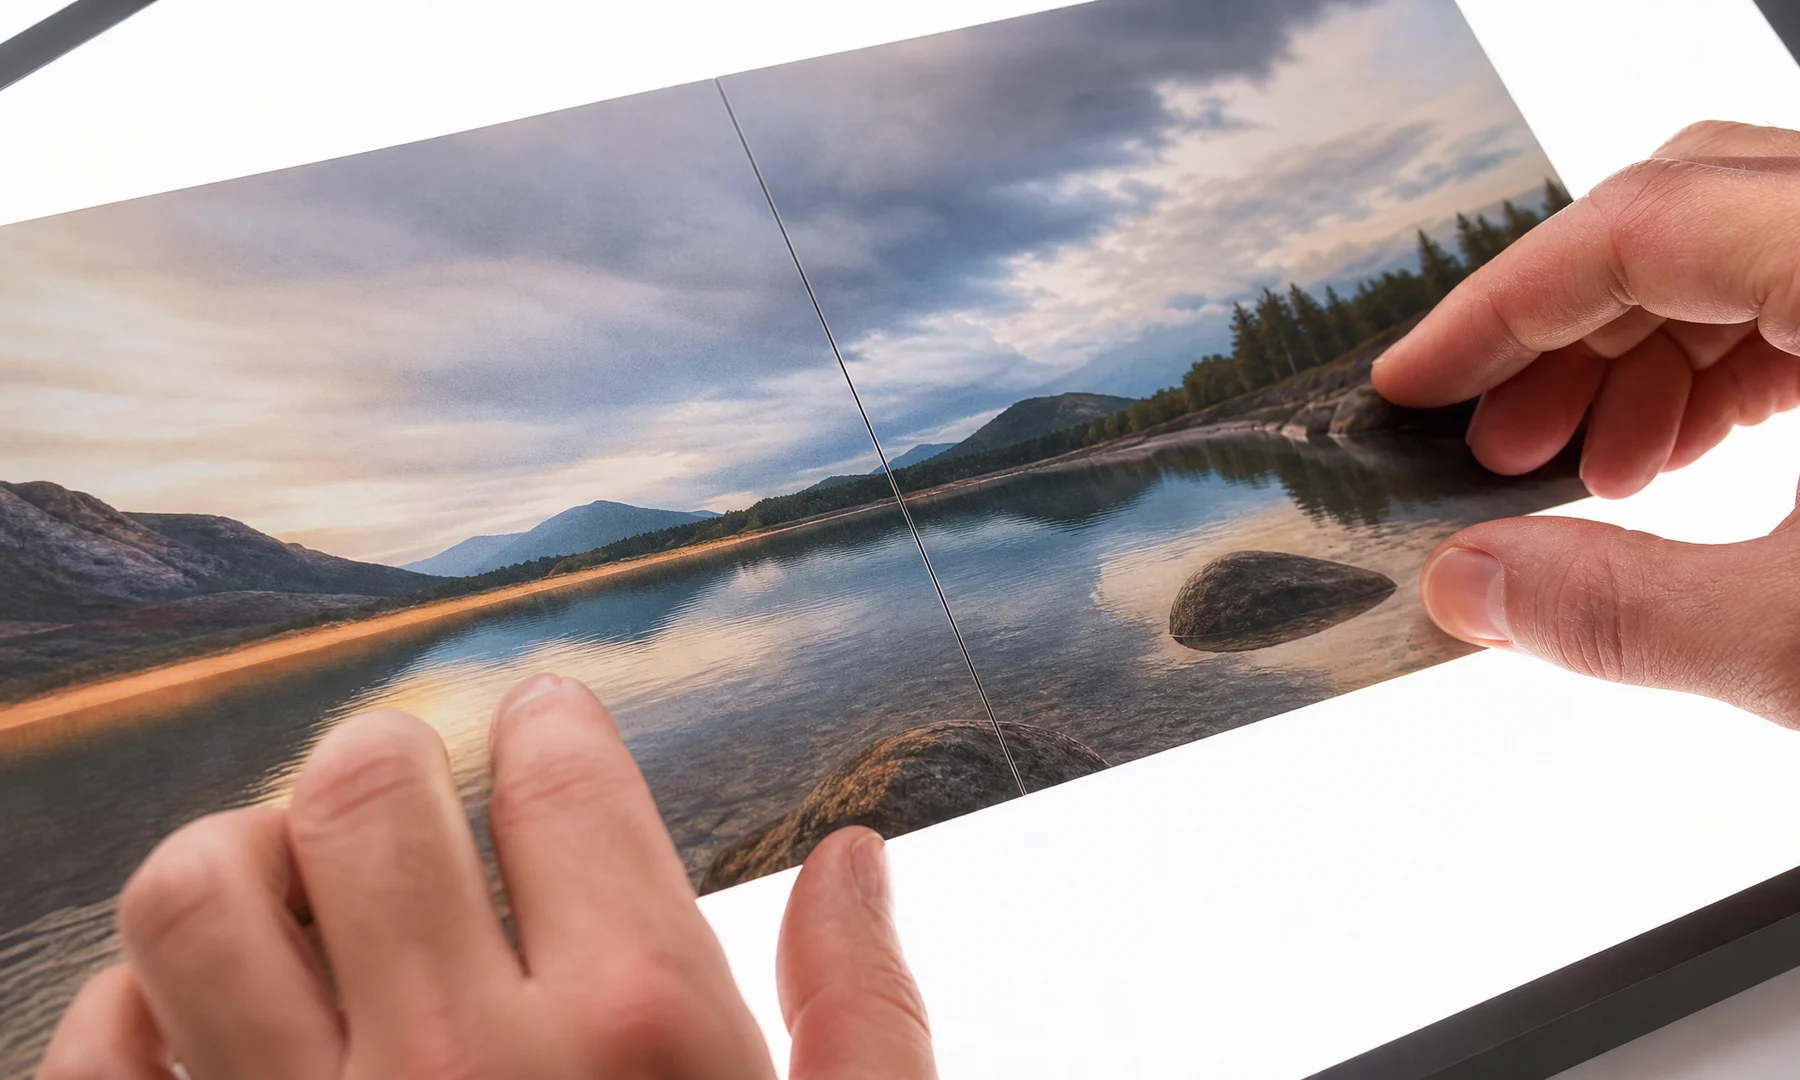
7. Print one test seam, not the whole poster
Don't print 25 sheets before testing.
Print two neighboring tiles that share a detailed seam, such as:
A face across two pages
A strong diagonal line
A high-contrast edge
A building outline
Any area with fine detail
Then check:
Does the printed size match what you expected?
Does the seam align after trimming?
Is the overlap large enough?
Is there a blank margin where image should continue?
Did the printer scale the pages without you noticing?
If the test seam fails, fix the settings and repeat. It is much cheaper than reprinting the full poster.
8. Assemble from one corner
A clean assembly method is simple:
Lay out all pages on a large table or the floor.
Confirm the page order before attaching anything.
Start from the top-left corner.
Build across the first row.
Continue row by row.
Align the image details first, not the paper edges.
Use small pieces of tape on the back to hold a seam temporarily.
Once the alignment looks right, use a glue stick where needed.
Reinforce finished seams with tape on the back side.
A glue stick usually gives cleaner joins than liquid glue because it adds less moisture. Back-side tape is useful for strength without leaving shine on the front.
If visible seams or glare matter, avoid front-side tape.
Recommended print settings
Use these as a starting point:
| Setting | Recommended choice |
|---|---|
| Paper size | Match the actual paper in the tray |
| Scale | Actual Size or 100% |
| Fit to page | Off |
| Borderless | Off unless tested successfully |
| Orientation | Match the poster layout |
| Quality | Standard or High |
| Overlap | 5–10 mm if available |
| Color management | Keep it the same for test and final print |
Printer menus vary, but the goal stays the same: stop automatic resizing and leave yourself enough room to trim and join pages cleanly.
If you are using Adobe Acrobat Reader Poster mode
Adobe Acrobat Reader includes a Poster option in the print dialog. It can tile a large PDF across multiple pages and add overlap.
It is useful when:
You already have a large PDF
You want Acrobat to split it into printable sheets
You need overlap and cut marks
You want a tile preview before printing
Still check these settings carefully:
Tile Scale is 100% unless you intentionally want a different size
Overlap is set to something practical, such as 5–10 mm
Paper size matches what is loaded
Cut marks help, but they do not replace careful trimming
One test seam prints correctly before the full run
Acrobat can handle tiled printing well, but Rasterbator.pics is often clearer for poster setup in the browser and gives you a predictable generated PDF to print afterward.
Common mistakes that create white gaps
| Mistake | Result | Fix |
|---|---|---|
| Printing with Fit to page | Tiles shrink slightly | Use Actual Size or 100% |
| Wrong paper size | Cropping or scaling | Match file, print dialog, and tray |
| No overlap | Blank printer margins show | Add 5–10 mm overlap |
| No trimming | White borders stay visible | Trim the joining edges |
| Mixed orientation | Pages do not align | Keep orientation consistent |
| Borderless without testing | Image may stretch or crop | Test first |
| Gluing too early | Seams shift permanently | Dry-fit first, then attach |
| Printing the full poster first | Wasted paper and ink | Print one test seam |
Checklist before you hit Print
Run through this before printing the full poster:
The loaded paper matches the selected paper size.
The print scale is Actual Size or 100%.
Fit to page and similar resizing options are off.
The printer preview shows the expected number of pages.
Orientation is consistent across the full poster.
Overlap is enabled if your method uses it.
You know which edges you will trim.
You have printed and checked one test seam.
You have a glue stick ready.
You have tape for reinforcing seams from the back.
If any item is uncertain, stop and test again before printing everything.
Pre-print mini checklist
Before the final run, check these last details:
Paper stack loaded neatly
Correct paper size selected
Actual Size or 100% confirmed
Overlap confirmed
Trim plan clear
One test seam approved
Knife, ruler, glue stick, and back-side tape ready
Enough table or floor space for assembly
FAQ
Why do white gaps appear between my tiled poster pages?
The most common causes are untrimmed printer borders, Fit to Page scaling, paper-size mismatches, missing overlap, or inconsistent assembly.
Should I print tiled posters at 100%?
Yes. Print the tiled PDF at Actual Size, 100%, or No scaling. Fit to Page can shrink every tile and create visible gaps.
Do I need to trim every page?
No. Usually you trim only internal joining edges, often the top and left edges as you build the poster from one corner.
How much overlap should I use for tiled printing?
A 5-10 mm overlap is a practical starting point for most A4 or Letter home poster projects.
Can borderless printing solve white gaps?
Sometimes, but test first. Borderless modes can enlarge or crop the page, which may create a different alignment problem.
Why do white gaps appear between my tiled poster pages?
Most printers leave an unprintable margin of about 3–5 mm. If you join pages without overlap or trimming, those blank margins become white gaps. Incorrect scaling, wrong paper size, and mixed orientation can make the problem worse.
Should I print tiled posters at 100%?
Use Actual Size or 100% unless you intentionally want to resize the poster. Settings like Fit to page often shrink each tile just enough to cause visible gaps.
Do I need to trim every page?
Usually not. Trim only the edges that need to join another page. A common pattern is to trim the left edge of pages added to the right and the top edge of pages added below.
How much overlap should I use for tiled printing?
For most A4 or Letter poster printing at home, 5–10 mm is a practical range. Larger posters often benefit from a bit more.
Can borderless printing solve white gaps?
It can, but not always. Borderless mode may slightly enlarge or crop the image to fill the page, which can create tiny alignment errors. Test two tiles first before trusting it for a full poster.
Is Adobe Acrobat Reader good for poster printing?
Adobe Acrobat Reader's Poster mode is useful when you already have a large PDF and want tiling, overlap, and cut marks. You still need the correct paper size, 100% scale, and one test seam.
What is the fastest way to check whether my settings are wrong?
Print two neighboring tiles that share a detailed seam. Trim and align them. If they match cleanly, your full poster is much more likely to work.
What should I use to assemble the poster?
A glue stick is usually the cleanest choice for attaching sheets without adding too much moisture. Tape on the back side is great for holding and reinforcing seams. Front-side tape is best avoided if glare or visible seams matter.
Try Rasterbator.pics
Use Rasterbator.pics to test the article advice with your own image, page size, overlap, margins, and tiled PDF export.
Try Rasterbator.pics